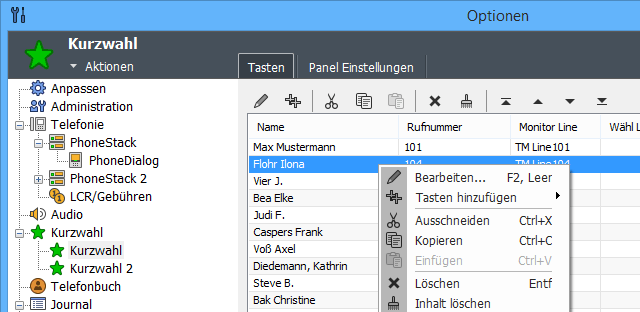
Configuration Dialog:
[Options > Speed buttons > Speed buttons]
Speed-dial buttons
Add buttons, remove, sort
In this list you can add buttons, remove, edit and sort in order. The functions can be accessed via the toolbar or the context menu. The list supports multi-selection and drag&drop.
Hint: Using the Copy, Cut and Paste the selected keys can be transferred to a different speed dial panel.
Edit settings for a speed dial button
The Settings dialog opens when you double-click an entry in the list.
Action types:
- Dial Phone Number: This is the default type. With a click to the speed dial button the phone number entered in phone number field is dialed.
- Dial Programming Code: This action type can be used to dial specific programming codes. Example: switch-on/off the night service of your PBX
- Open File: To open a file or folder.
Open URL: With click to the speed dial button the web-page specified in URL is opened in your standard-browser.- Start Program: A speed dial button click runs the specified file (EXE). Use the right button to select the EXE file.
- Shortcut to speed dial panel: By clicking on the Speed Dial button, the content of the linked speed dial panel is displayed in the form of a context menu. Selecting a menu item is identical to pressing the corresponding key.
Key name: Labeling of the speed dial key
SIP-User-ID: Pickup may require the SIP User ID instead of the phone number. Please ask your PBX admin if this information is necessary.
Icon: Here you can select optionally an icon or a small bitmap for the button.
Hints:
- The pictures may be up to 256 pixels wide and high.
- Supported file formats: bmp, jpg, jpeg, png, gif, ico, icon.
- In the speed-dial panel settings, you can specify whether large icons / images are to be displayed for large buttons, or only small ones (16x16).
Global Hotkey: You can assign a global hotkey to a speed dial button (for example the F11). Now you can hit the speed dial button by F11, also if the CTI Client is minimized. However, the application must be started.
TAPI-Device/MSN: If you have configured several TAPI devices or several MSNs to a TAPI device, you can assign it to a speed dial button. This can make sense, for instance if you use one MSN for business calls and another MSN for private calls.
Panel Settings
Buttons - Setting and arrangement
Size: The size refers to the height of the buttons. Small buttons are displayed in one line with a small icon (if available) and no info line. Large button show in addition to the key labels and large icons (if any) to an info line with additional information to the status of the subscriber or an assigned Tapi-Monitor line.
Width: This setting is available only if columns is set to "automatic". It is a default for the width of the keys. The actual width of the keys is also evident from the width of the panel, as always tries to display the keys coverage.
Columns: Specifies the number of columns in which the keys are arranged. If the selection is set to "automatically", the number of columns depending on the panel width and the default buttons width.
Orientation: Determines the alignment of the panels (the direction of the keys to columns or rows).
If the alignment "by columns" is selected, the buttons are arranged in columns from top to bottom.
If the alignment "by rows" is selected, the buttons are arranged in rows from left to right.
Distance horizontal/vertical: Determines the distance between the keys.
Window - Settings
Minimum window height: This setting defines the minimum window height when the panel is displayed as a tab window in the application window. It ensures that at least the appropriate number of rows remain visible even if the size of the application window or the position of the splitter changes so that the corresponding panel is compressed in height. It has no effect on the display of the panel as a popup window.


