In the CTI Client, you can link your existing Outlook contacts or other data sources (eg CSV text files, ODBC, LDAP). Besides, the adaptable data structure adapts itself to your data source. Only a classification of the column contents is necessary - instead of a column assignment.
Alternatively you can also import your existing data.Integrate existing data sources
New... > New Folder Linking...
By this menu entry you can insert an available telephone directory (or generally data source). Only a connection to the original data source is established, you therefore always work with the original dates. For databases a local cache is created by default in order to facilitate a fast application start.Create new local folders
New... > New Folder...
A new empty folder is created which is connected with a text file. This folder is always based on a textfile (csv format).
After you have entered the folder name and filename you can select from a set of data form. If none of the data form corresponds to your requests, you should choose the best one and fit this later onto your requests.Supported data sources
Outlook The contact folder of Outlook/Exchange can be integrated with writing and reading rights. more... Google Contacts As of CTI Client Version 3.1.023, you can now integrate CardDAV servers as phone book folders (reading and writing). more... CardDAV As of CTI Client Version 3.1.023, you can now integrate CardDAV servers as phone book folders (reading and writing). more... ODBC Via the ODBC interface of Windows you have access to databases, such as Access, MySQL, Microsoft SQL Server, DBase or Excel spreadsheets. more... Lotus Notes Lotus Notes Contacts can be integrated readonly. more... LDAP The LDAP-Connector allows the read access to LDAP directories, e.g., the Active Directory of Windows 2003 Server. more... Text files / CSV As the simplest data format text files can be read in in CSV format, whose data fields are separated by semicolon or tabulator. more... HTTP CSV files can be loaded via HTTP also from a web server. In heterogeneous enviroments central phone books can be provided. more...
ACT! With the ACT!-Connector you are able to link one or several ACT! databases (read-only). more... cobra Adress PLUS The contacts of the CRM applications "cobra Adress PLUS" can be integrated in read-only mode. more... combit address manager The contacts of the CRM applications "combit address manager" can be integrated in read-only mode. more... CAO-Faktura CAO-Faktura is an ERP system that is available in a free version. more... Tree Structure
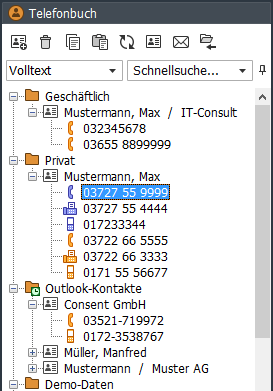
In the first level the folder names are shown.
The name of the folders entries are build by columns which are marked as name columns. Mostly those ones are name and first name. If no name or first name is entered, the company name is shown even if the column with company name was not marked as a name column.The third level shows all phone numbers for the record if more than one exists. If the record contains only one phone number, this is shown next to the telephone receiver as soon as the record was selected.
Used Icons:
Business phone numbers
Private phone numbers
Search
New search bar features (from version 3.1.046):
- New: Multi-word search with all field filters.
- New: Search by beginning of word or full text in all field filters.
- New: Creating and editing field filters.
- New: Search using regular expressions/wildcards (*, ?).
- New: Search with and without uppercase/lowercase letters.
- New: Direct search in data sources with query limits (e.g., LDAP servers). Important notes...
Search in
"All Folders",
"Selected Folder":
The search source can be changed by clicking the left icon in the search bar or by pressing F7. If the input focus is on a folder or folder entry in the tree view, you can start the search for that selected folder by typing the search term. In this case, the input focus will move to the search bar, and the search source will automatically be switched to "Selected folder".Display of the Entire Folder Content: After display of a search result you must collapse and expand the folder again in order to display the entire content.
Select, create, and edit field filters: You can select a field filter from the drop-down menu using the button to the left of the search bar. The selected filter determines that only in the appropriate fields (field types or field name) is searched. You can edit existing filters and add new ones. To edit the field filter, select the appropriate menu item in the filter menu, or open the configuration from the main menu [Options > Search].Notes on configuration...
The "Full Text" field filter combines the search in all fields with the "Full Text" search mode (at any position), regardless of whether the "Search at beginning of word" search mode is activated.
Multi-word search: If you are searching for multiple terms, they must be separated by a space. All terms are searched by a logical AND operation. If the search term itself contains spaces, it must be enclosed in quotation marks. If a search term starts with a "-", only search results that do not contain that term will be displayed.
Example1: "max muster" searches for "max* AND muster*".
Example2: "max -muster" search for "max* AND NOT muster*".Search by word beginning or full text: The "Search at the beginning of word" search mode can be set in the context menu of the search bar. If it is disabled, the "full text" search mode will be used. Additionally, the search mode for each search term can be controlled by using "regular expressions".
Notes to: Search using regular expressions/wildcards...Search with and without case-sensitive: If a search term is entered entirely in lowercase, case sensitivity will be ignored. Includes a search term uppercase letters, searching is carried out case-sensitive.
Start search automatically: When this mode is enabled, the search starts automatically as you type your search term. Otherwise, the search will only start after pressing the Enter key. The startup mode can be set via the search bar's context menu.
Reset/Delete the search bar: The contents of the search bar can be deleted by simply pressing the "Delete" key when the input cursor is after the last character. This also resets the search results in the folder view. The "automatic reset of search input" function, which was available up to version 3.1.046, has been removed.
Direct search in data sources with query limits (e.g., LDAP servers)
This is a new feature starting with version 3.1.046. Online data sources are often configured with a query limit. This is especially true for LDAP servers. If such a data source is integrated into the CTI Client as a phonebook folder, it cannot be fully loaded into the local cache. Therefore, the relevant phonebook folder will only display as many entries as are allowed by the query limit.
Therefore, complete access to all data records is only possible through a targeted search query of the data source. This applies to phone number searches during a call and when using the search bar in the phonebook, search window, and phone dialog. The found entries are stored in the local cache and are then immediately available in the phone book folder. More infos...Query filter
Using query filters, you can create more complex search queries that take into account the content of multiple fields.
Hint: Filters are saved folder related.Simple Alternative: For a search query which refers only to the content of a specific field you do not have to construct a search filter separately. You can add this field simple into the search field selection box, by open a record of the folder in the date mask and double-click onto that field name and activate the option <Show in search-field select box>.
Create a Filter:
- Select the folder.
- Choose the entry <Filter> in the search field selection box
- Choose the entry <create filter...> in the search content selection box
- Further details see Dialog <Create/Edit Filters>
Sorting
- The folder contents are sorted by default setting with the help of the marked name columns. Definition of the name columns
- You can also sort according to other columns - you only have to provide a special view.
See: Tab [View]Change the order of the folders
- The folders can be moved with the mouse.
Import records (to an existing folder)
Import records (into an existing folder)
- Select the target folder.
- Open import dialog via the context menu [Import > Import (into the selected folder)].
- Select type of data source an open these.
- In the dialog "Column assignment" you define the assignment between the source and target columns.
- Importing records. The import-status is indicated in the header of the main window.
Import the record from the clipboard
- Select the target folder.
- Import dialog via the context menu [Import > Import record from clipboard ...].
- Format the import data so that each data field is in a row, but without changing the order.
- Select the required columns from the destination folder.
- Adjust the order of the target columns according to the order of the import data. The column order is automatically saved for the next import.
- In the following "Column Assignment" dialog, you can check the assignment again and execute the import.
Cache, Refresh
For linked data sources, such as Outlook, ACT! or ODBC, a local cache is created.
Synchronisation
By default the cache is updated once in a week automatically. Use F5 to update the cache manually. Select the folder and press the function key F5. Then all changed records are read in anew. If you press F5 within 5 seconds again, the folder is read in completely anew.Data Form
Adaptable data forms
Every folder has his own data form which you can adapt individually to your needs:
- Position and size of the fields
- Label
- Contents type
- Icon
- Grouping via frame
- Creating new fields (for CSV files)
Protect Data Form
This is a folder option. Activate it by: click on folder with the right mouse button > Properties (Folder)
Customize data forms
The adaptation of the folder-specific data forms can be done directly in the data form. To display the data form, a record of the folder is to be marked and then press F2.
Activate edit mode: Click to button
to display the dialog edit toolbar.
Positioning of the fields: Click on the field name / icon and move the field with pressed mouse button. The tool bar
Fine Positioning of the Fields: By default, fields can be moved only in a fix pixel pattern. If you move fields with pressed ALT-button, also a pixel-wise positioning is possible.
Modify Name, Icon and Type: A double-click on the field name brings the property dialog or you click the field name/icon with the right mouse button and modify the properties by the popup menu.
Hide/Show Fields: If you set a field to "hide", that field is only hidden in the view, the data contents is not affected.
Copy data masks
The settings for the data mask and the column typing are saved in the "mask.cfg" file under:
- [File > Working Directory > Open > "folders\PHONEBOOKNAME\cfg\mask.cfg"
- If you copy this file, the CTI Client should be closed.
Configure Folder Properties
To display the folder property dialog, you have to click with the right mouse button onto the folder and select [Properties (Folder)].