xtelsio CTI Client InstallationThis manual describes the installation steps, the initial configuration of the TAPI device, the integration of Outlook contacts and the basic telephone control. You can find additional help topics via the CTI Client main menu [? > Help] as well as via the context menus and the help buttons of the configuration dialogs.
|
|
Installation
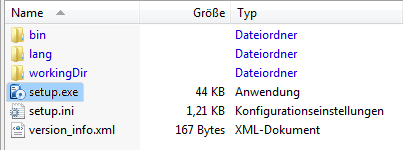
Un-zip the ZIP archive and then run setup.exe.
In the Setup startup dialog, click [Next >]. In the following dialog the license agreement is to be confirmed.
Setup dialog "Program directory"
Setup - xtelsio_CTI_Client 3.1.xxx
C:\Program Files (x86)\xtelsio_CTI_Client\
The proposed program directory should be used if possible.
Setup Dialog "User"
Setup - xtelsio_CTI_Client 3.1.xxx
Here you determine whether the application should be installed only for the current user or for all users. This affects later, whether the program shortcuts are created for the current user or all users in the Startup menu and on Desktop.
Setup dialog "Working directory / Config directory"
Setup - xtelsio_CTI_Client 3.1.xxx
C:\Users\%USERNAME%\Documents\xtelsio_CTI_Client_Data\
The default path is "%EIGENE_DATEIEN%\xtelsio_CTI_Client_Data". Alternatively, the working directory can also be created in "Application Data" or a personal network drive.
Hints: Each user needs his own work directory. A working directory must not be used by multiple users simultaneously.
Setup dialog "License"
Setup - xtelsio_CTI_Client 3.1.xxx
If you already have a license key, you can enter it here.
Alternatively you install "without a license" with 30 day trial period.
Setup dialog "Components"
Setup - xtelsio_CTI_Client 3.1.xxx
The "ActiveX telephony component" is only required for special applications.
The "Outlook Addin" created a special dial button in Outlook to just call from emails or contacts.
The "CTI Client TAPI-Connector" provides a TAPI device in the system, which can optionally be used in any other TAPI application.
Setup dialog "Short cuts"
Setup - xtelsio_CTI_Client 3.1.xxx
Hint: The system tray is the right area of the Windows task bar.
With [Finish] the installation starts.
Configuring TAPI Device
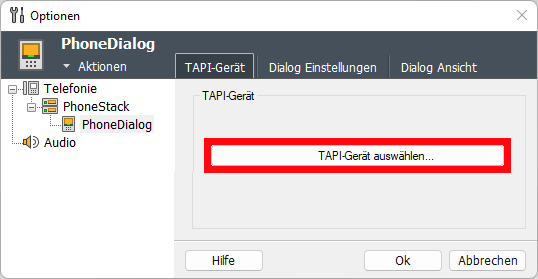
Select TAPI device
Select from the CTI Client main menu: Options > PhoneDialog (TAPI Device) ...
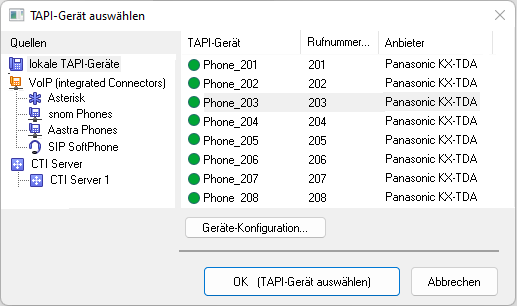
Selection dialog
Here you can select your TAPI device.
Under "Local TAPI devices" all TAPI lines of all installed TAPI drivers are listed.
For questions regarding the installation of the TAPI driver for your PBX or phone, please contact your phone administrator or the manufacturer of the system or the phone.For some phones / PBX's of the CTI Client offers integrated drivers:
- Asterisk-based VoIP telephone systems
- SIP phones: Snom, Aastra, Yealink; (DECT-phones are not supported)
- Fritz!Box e.g. with Fritz!fon (DECT)
- The "SIP Softphone" allows direct SIP telephony via headset.
Dial Settings
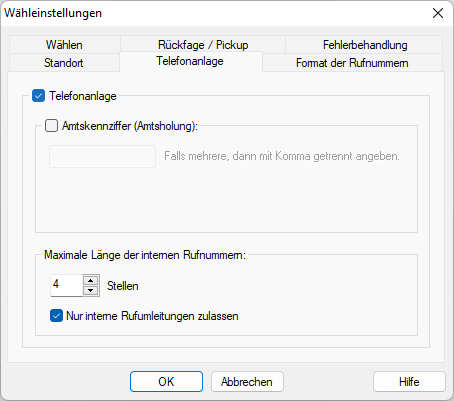
Phone_203 After selecting the TAPI device, the dial settings are still to configure.
Important here are mainly the settings to the PBX / outside line access code:
Indicate here if your PABX requires a outside line access code.
Some information is also available via the [Help] button.
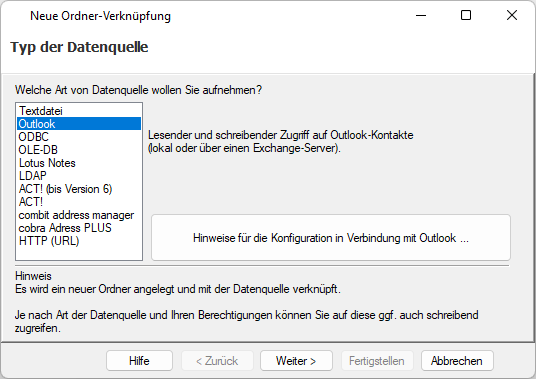
Link Outlook Contacts
By following steps you can integrate your Outlook contacts in the CTI Client.
Select from the CTI Client main menu:
Phonebook > New > New Folder Linking > Outlook, ODBC, ....
Select "Outlook" on left side and click [Next >].
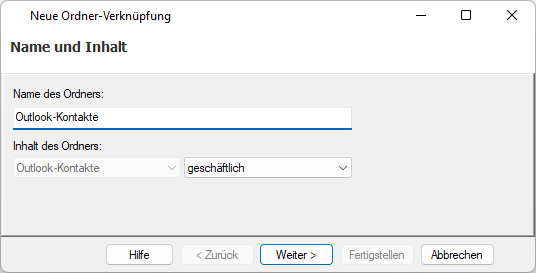
Dialog "Name and Content"
You can adjust the default folder name, as needed.
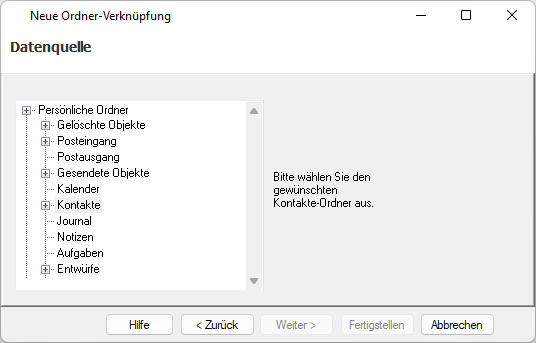
Dialog "Select Data Sources"
Here you can select the desired Outlook Contacts folder.
After click on [Next >] the contacts from this folder are read.Hints: Only one folder can be selected a time. Subfolders are not automatically imported. If you want to include multiple folders, the entire process is to be executed per folder.
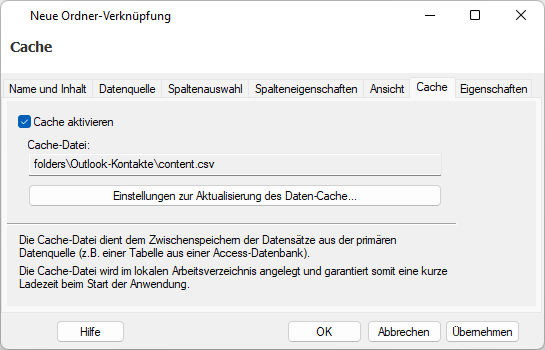
Dialog "Cache"
Contact information will be cached locally, so they do not need to be re-read by Outlook at each application start. In Outlook changed or new created contacts are automatically transferred later.
After [Finish], the Outlook Contacts folder will be displayed in the phone book of the CTI Client.
Special settings can be made later by [right click the folder > Properties].
Dial from other applications using a hotkey or mouse click
by Hotkey
Mark a phone number in the another application and hit the break key (or another configured Hotkey). The marked phone number is transmitted into the clipboard and then dialed from xtelsio CTI Client. Configuration: [Options > Telephony > Dialing from other applications]
Tip: Under [Options > Telephony > Answering Calls] the same hotkey can be configured also for answering and hanging up.
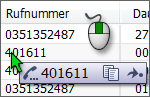
by mouse click
Click with the middle mouse key on a phone number in any application. The xtelsio CTI Client tries to recognise the phone number and popups a small menu to initiate the call. Dial by mouse click is to activate via: [Options > Telephony > Dialing from other applications]
Alternatively, [Ctrl + right mouse button] can be used.
Phone Control via PhoneDialog
The PhoneDialog is used for status indication and control of an assigned TAPI device (phone). If you want to control multiple TAPI devices, you can create a corresponding number of phone dialogues. More infos...
Based on Windows® TAPI interface the xtelsio CTI Client offers comfortable telephony features: Dial, Hang up, Answer, Consultation, Hold, Toggle, Transfer, Conference, Redirect.

Dialing via folder structure
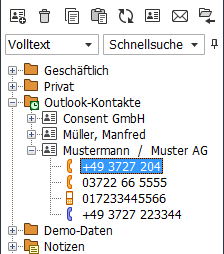
A double click on a phone number / name in the folder structure initiates a call setup.
If only one phone number is put down to a record, the suitable phone icon (e.g.,
) is shown beside the name.
If there are several phone numbers to one record,
is shown before the name. Then a double click on the name lists all phone numbers.
= private phone number
= business phone number
= business fax number
Speed Dial / TAPI Monitoring
The speed-dial buttons allow quick call setup by mouse click. By the the context menu of the speed dial buttons a TAPI device can be assigned to every key whose connecting state is signalled then by LED. So you see immediately whether the other one is free or just calls up.
In conjunction with the CTI Server, a speed dial panel can also map a client group with presence status.
Permanently visible speed dial (Sidebar):
Via [Menu > Window > Sidebar] permanently visible speed dial buttons can be shown on the screen .
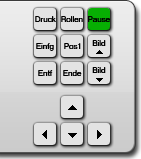
Dial via keyboard (prepare dial)
The function "Prepare dial" displays the standard PhoneDialog in the foreground and assigns the input focus.
The "Dial via keyboard" works as follows:
- Press hot key for "Prepare dial".
- Enter the number to be dialed.
- Press "Return" to start dialing.
Configuration: [Options > Telephony > Prepare dial]
Dialing from within other applications
The CTI Client provides functions to dial from other applications, via middle mouse button (OCR), Hotkey, TAPI connector, or through a URL link.More infos...
Terminal Server / RDP
As of CTI Client Version 3.1.009 you can connect a local CTI Client instance to a CTI Client instance in a terminal session. This is useful, for example, if:
- the CTI Client SoftPhone should run locally,
- a TAPI driver is only available locally,
- an IP telephone can only be integrated locally.
- More infos...
Outside line access code:
Via "Out" button you can set the outside line access code for external numbers. The outside line code is automatically added when dialing. The numbers are therefore always to enter without an outside line code.
In the journal, the numbers are always displayed without outside line code. If the numbers are displayed with outside line code to you, the settings for an outside line code are probably not correct.Outside line access in the Windows TAPI system:
Since the outside line access is managed by the CTI Client, NO outside line access code should be entered in the Windows system under [Control Panel > Telephone and Modem > Dialing Plans > Own Location > Edit]!
This is relevant if you execute TAPI dialing actions in other applications (via the "CTI Client TAPI Connector" or via "Assisted Telephony").Outside line access when dialing from other TAPI-enabled applications (e.g. CRM application)
If you dial from other TAPI-enabled applications, no outside line access code should be configured in these applications or under "Phone and Modem".
However, if an outside line access code is required there, then the CTI Client must be informed via the following settings that the phone number will be transferred with an outside line access code.[Options > Telephony > Advanced Settings > More Settings]:
- Dialing via Assisted Telephony includes the outside line access code
- Dialing via "CTI Client TAPI-Connector" transfers the phone number with outside line access code
FAQ / Error pictures
- FAQ1: With TAPI dialing, a 0 is removed from the phone number.
- Example: In the CTI Client you dial 005401234567, with the first 0 being the outside line access.
However, the CTI Client interprets this number as an international (Argentinian) number and removes the 0 after 0054.- Solution: You must configure the outside line access code in the CTI Client and then ensure that you always dial the numbers without an outside line access.
- FAQ2: Telephone numbers are displayed in the CTI Client with an outside line code or the 0 in front of the area code is missing.
- There is also no name resolution based on the integrated telephone books.
- Solution: Check the outside line access settings
TAPI-Functions
Basic TAPI Functions: The base-functions are supported from most TAPI devices. Dial
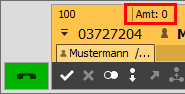
Click the green handset button or the "OK" button to dial the number in the appropriate field.
If your environment does not support TAPI dialing with automatic handsfree, possibly your phone is ringing first and as soon as you pickup the target subscriber is called.Hang Up
To drop call, you can click on the "red" button or the "X" button. This function is not supported by all TAPI drivers. If available, the "Ok" button is enabled.
Extended TAPI functions: The extended functions are only available if supported by the hardware and the TAPI driver. Functions which are generally not supported are hidden. Functions that are not available in the current conversation state are disabled (grey). Consultation
You are already in a conversation. Setup a consultation to another phone number causes that the current call is held and the other user is called. As soon as the other party accepts, you can transfer the call. Depending on the TAPI device/driver, SwapCall and/or Conference is also supported. Consultation by speed dial button: If you are already in a conversation, a click onto a speed dial button holds the current call and dials the phone number as a consultation call. Hint: You can assign hotkeys to the speed dial buttons.
Consultation by tool button: A click to button "R" pops-up a menu with the speed dial targets. The first menu entry can be used to enter a destination number by hand.
Consultation by Call-Tab: Enter a consultation number on a second call tab, and then press Enter. Hint: Via the call tab, you can also search for name.
Konferenz
Das Konferenz-Icon wird erst freigeschaltet, wenn Sie sich in einem Rückfrage-Gespräch befinden und der TAPI-Treiber Konferenz unterstützt.
- Das integrierte SIP-SoftPhone unterstützt Konferenz erst ab Version 3.1.025. Notes on configuration...
- Die integrierten VoIP-Phone-TAPI-Treiber (z.B. für Yealink oder Snom) unterstützen keine Konferenz. Hier wäre die Konferenz direkt am Telefon zu schalten.Transfer
The held one and the active user are connected with each other. You can hang up. Some telephony systems offer also call transfers in ringing state, that is you call a user by consultation and hang up, still before he picks up. The held user hears the ring tone now. You can hang up. Hold
As soon as you put a conversation on hold, the other user hears wait-music and you can call a further user (consult) or you can re-connect to the old conversation. 
Redirect incoming call or conversationA click to this tool button pops-up a menu with speed dial targets for redirect. The first menu entry can be used to enter a destination number by hand.
Redirect by drag-and-drop: Drag and drop the active call tab to the desired speed dial button.
Pickupvia speed dial key: For this function a speed dial button has to be assigned the TAPI line of the other extension. See: Speed Dial. If you click a speed dial button during incoming call the call is redirected to the own TAPI line. via Pickup button: Clicking on this tool button shows a menu with all speed dial targets for Pickup. The first menu entry can be used to enter a destination number by hand.
Redial
Ends the current call and starts the redial timer (30 sec). On timer elapsed event the number is dialed again automatically.
For configuration see: [Options > Telephony > Extended Settings > Redial]
Error Analysis
If you have a problem with the telephone control, for example your telephone does not react as wanted or the application indicates a wrong call state, then you can use the TAPI Monitor to analyse the error.
The receiver does not react anymore: Probably the TAPI Driver was wedged. Is the case run [File > Re-start Application]. If that does not help, restart your computer.
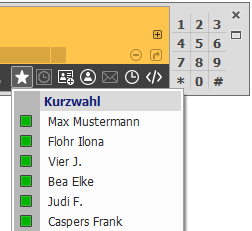
Speed Dial
The CTI Client offers you the opportunity to create multiple speed dial panel. A speed dial panel can be displayed as a popup window or embedded in an application window or a sidebar. The number of speed-dial buttons per panel can also be freely configured. Simply by drag and drop the speed dial buttons can be rearranged or moved to a different panel (Ctrl-key forces copy rather than move).
Edit settings for a speed dial button...

Action types of speed dial buttons
The action type "Dial number": A click onto the speed dial button dials the phone number. If you are already in a call, it setups a consultation call.
The action type "Open File": A click on the speed dial button opens the file with the specified file name.
The action type "Program start": A click on the speed dial button opens the program with the specified file name.
The action type "Open URL": A click on the spee dial button opens the URL/WebPage in your default browser.
The action type "Shortcut to speed dial panel":
A click on the shortcut button opens a menu with the content of the linked panel. Selecting a menu item is identical to pressing the corresponding key.More information on configuring action types...
Functions of the context menu
Pickup: The own TAPI device pickups the current call from this phone.
Redirect own call to: Your own call is redirected to this subscriber (blind transfer).
Redirect incoming call to: The ringing call on your own telephone is redirected to this subscriber.
Send Call EMail: This function creates an e-mail to the currently selected journal entry. The "Subject" contains the call information and the email text is initialized with the call-notes. Receiver is the email address specified to the key.
Call Forwarding on/off: Your telephone is forwarded to this subscriber. The menu item is only enabled if you TAPI device supports call forwarding.
Toggle between small and large buttons: In submenu "Panel" you find the menu item to toggle between large and small buttons. Large buttons allow to display extended information about the connection state or to the presence status of a subscriber.
Link/remove Monitor LED: The button can be assigned a TAPI device whose connection state is then indicated by LED.More information on Monitor LED...
Show Alert: You may request a notification for the following events for a monitored extension:
- after the call has ended
- after the end of the next conversation
- if the Presence Status changes to "Available"
For the type of alert following options are available:
- Create Date "Reminder" and show it by Alert window
- Play beep
- flash the speed dial button several times
- View speed dial panel in the foreground
Monitoring via LED

For team work, it is good to know who's on the phone within a group and who is free. Via context menu a TAPI device can be assigned to each button whose connection state is then indicated by LED.
A typical configuration would be to embed a speed dial panel in a sidebar, and thus to have it permanently visible. Is a sidebar is not visible, it can be displayed by [Menu > Window > Sidebar].
More information about using SideBars ...Adding speed dial buttons and settings are done by: [Main menu > Options > Speed buttons].
Hint: To view the status of other phones, you need a multiline TAPI driver in conjunction with the CTI Server or another Telephony Server.
The following states are signaled by LED:
No TAPI device is assigned. The phone is free. flashing: Incoming call The phone is in conversation state. flashing: Incoming call waiting The phone is in a special state: Call forwarding, DND,
"Out of Service" (not available)Error condition: The TAPI device could not be opened. Hint: You can adjust the brightness of the LED in state blinking between 20% and 100%. The flashing status can also be signaled by a "steady light" to avoid too much deflection from other tasks.
Server-Panel
The speed-dial buttons on a server panel represent individual CTI Clients that are managed by the CTI Server in a network environment. The CTI Server can summarize these clients as members of groups. Since the configuration of the buttons is specified by the CTI Server, on a Server-Panel no buttons can be added, removed or edited.
The server panel supports a simple 1: 1 chat feature that allows you to chat with available teammates. More information can be found here...
Configuration of a server-based Speed Dial Panel
- Configuration of a Client Group in the CTI Server:
- In the CTI Server, clients are to configure. This clients is to assign their TAPI device and the parameters Name, First name and Phone number must be set.
- Hint: The telephones may also be integrated locally in the CTI Client (for example Yealink). In this case, no TAPI device is to be assigned in the CTI Server. The CTI Clients then report their TAPI status to the server, which is displayed to the other Clients via the group.
- The configured Clients must be united into a group.
- You can use the group permission "Display phone numbers" to determine whether the caller numbers should be visible on the speed dial buttons/tooltips.
- How to integrate the group in the CTI Client:
- The "CTI Server"-plug-in must be enabled under [Options > Customize > Components and Plugins].
- Under [Options > CTI Server] the connection to the CTI Server is to be configured.
- Under [Options > Speed buttons] click the Button "Link CTI Server Group panel" on right side. Here the group is to select. After closing the options with OK, a new speed dial panel appears. You can embed this panel by drag&drop into the main window or the sidebar.
Presence status on server panel
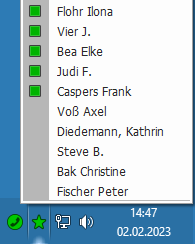
The speed-dial buttons on a server panel can show the presence status of each member (CTI Clients) of a group.
The presence status is displayed on the speed-dial button with an icon. The basic states "available" and "not available" can be signaled in addition via button background color (green=available, blue=not available). If the setting "large buttons" is active, additional information on the presence status will be displayed in a text line.
Hint: The presence status function requires a license key for "Presence Management" in the CTI Server.
The license is only required once (150 EUR) per server. Configuration of the presence status indicator...
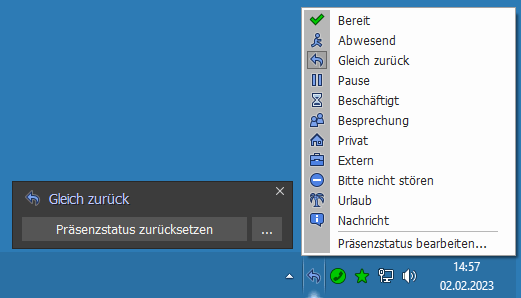
Explanation of the presence states:
Description ID Short name available 0 available looged out from the Server 1 loggedout Absent from work 2 away Back at work soon 3 brb pause 4 pause busy 5 busy in a meeting 6 meeting not ready for work (holiday, sick, ...) 7 private Out of office (field service, business trip, etc.) 8 external please do not disturb 9 dnd holidays, days off 10 holiday Status with message 11 msg Hint: ID and Shortname can be used as parameters for the command line and placeholder variables (e.g. interworking).
Change your own presence status
The own presence status can be adjusted with the help of the function "Edit presence status ..." in the context menu of the "own" speed dial key. A dialog appears in which the presence status, a message, the status end, as well as call forward or DND can be set.
If only the presence status is to be set, this is most quickly possible via the "presence status symbol" in the system tray and the corresponding context menu.
If the own presence status is set to a status other than "ready", an additional "status warning dialog" is displayed on the desktop (optional). This dialog can be used to change your own status or reset it to "ready".
Change presence status via Command line / Shortcut key / Interworking
For example, if you often want to set your presence status to "Away"+Call Forwarding, you can use a command line command to do this.
Hint: Call Forwarding/Do Not Disturb is not supported by all TAPI devices.
- Command line parameters for cti_client.exe
- Example: cti_client.exe /presence away -cf="0371 123456"
- using the shortcut key:
- Assign a shortcut key with the action type="Start program".
- Then enter the command line command under "File name".
- Hint: Specifying "cti_client.exe + parameters" is sufficient. Therefore, you do NOT need to enter the full path to "cti_client.exe."
- Tip: A speed dial key can also be assigned a global hotkey.
- Only supported from version 3.1.025.
- via Interworking:
- Create a new sequence with Action="Open Document/URL" via [Options > Interworking].
- Then enter the command line command under "Document/URL".
- Hint: Specifying "cti_client.exe + parameters" is sufficient. Therefore, you do NOT need to enter the full path to "cti_client.exe."
- Tip: A global hotkey can also be assigned to an interworking sequence.
Change the presence status of another teammate
In the basic configuration, the group rights in the CTI Server are configured so that each group member can also change the presence status of the other group members. In this case, a change of the presence status can only be made via the "Edit presence status ..." function in the context menu of the respective speed dial key. If this option is to be restricted, the configuration of the group rights in the CTI Server can be adjusted accordingly.
In the status edit dialog you can see who set the status.Set "Home office" as your location in your local profile
Starting with program version: In version 3.1.042, it is possible to set the location as "Home office" in a local profile and automatically activate it when the application starts.
Weitere Hinweise zu "Lokale Profile" finden Sie hier...

Speed dial menu
The speed dial menu provides quick access to all speed dial buttons with assiged phone number. It can be displayed via a self-defined global hotkey, a system tray icon or the tool button "speed dial menu" on the PhoneDialog.
Configuration
Common Speed Dial Settings: [Options > Speed buttons]
Settings for buttons/panel: [Options > Speed buttons > Speed buttons]
For more help topics, see:
the CTI Client main menu [? > help]
the context menus
e.g. right-click in the Journal window > Help
the help buttons of the configuration dialogs.